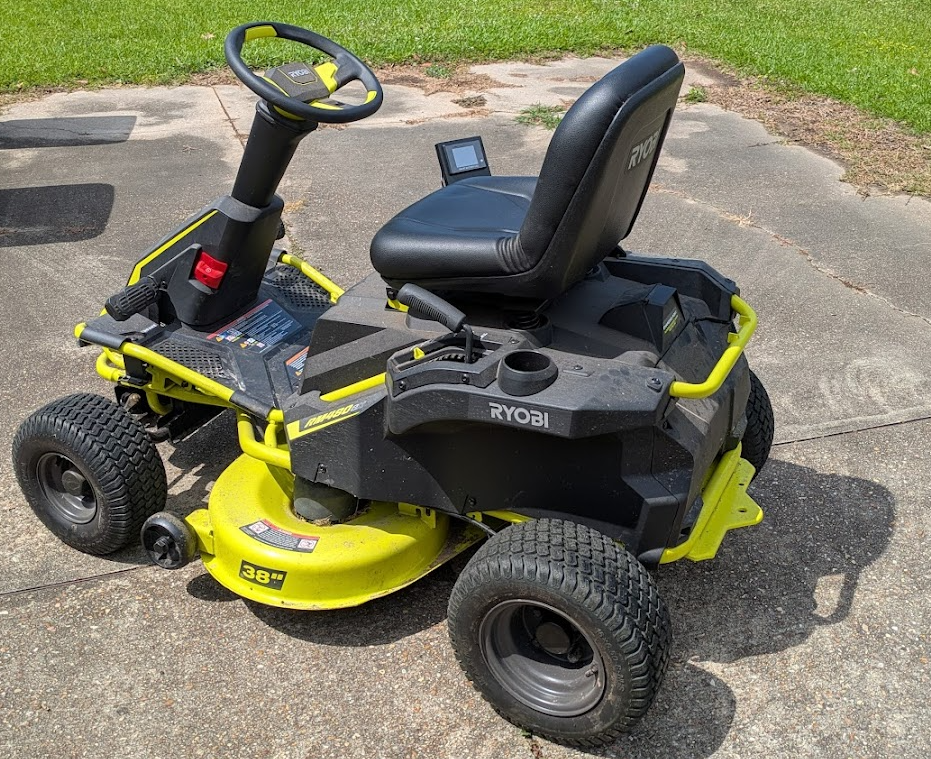
Upgrading My RYOBI 480ex Riding Mower Battery to LiFePO4
Dear reader, I'd like to take you on a journey-- the same one I have just been on-- that started with trying to figure out why my electric riding lawnmower (the RYOBI RY48111, confusingly also named the 480ex, suddenly stopped working.
 Let me start by saying that I love that mower. Yes, it's more expensive than a gas-powered one, but I never have to run out and buy ethanol-free dinosaur juice that's going to stink up my car, I never have to change any spark plugs or change the oil and oil filter. I don't have to worry about an alternator breaking, nor do I have to "stabilize" the gasoline during the winter.
With an electric mower, you just plug it in to charge up the batteries, then away you go. And the 480ex was every bit as powerful as a gas mower. I easily cut the front and back on a single charge with plenty to spare.
Until one day, about 2 weeks ago...
UPDATE - 1 Year Later: Click here to read my thoughts one year later.
The Problem
I've had the mower now for right at 3 years. I was mowing my back yard, and after about 5 minutes, it just stopped and started beeping at me. I thought I just had a clog or something at first, so I raised the cutting deck and turned it off and back on, but every time I tried to go anywhere, it would drive for 2-3 seconds, then stop and beep five times.
After a quick check on the Internet, turns out the old stop-and-5-beeps meant that one or more of my batteries was bad.
The Original Batteries SUUUUUCCCKKKKK
The batteries which come with the mower are 12 volt "SLA" or sealed lead-acid, very similar to car batteries. There are 4 of them wired in series for a total of 48 volts. Here's some things I wish I knew ahead of time:
-
Allowing them to get below 50% does physical damage do the batteries. That's why the mower tells you to leave it plugged in at all times!
-
They are very expensive to replace. As of the time of this writing, a single new battery from the company costs $230 + shipping.
-
They are only expected to last 1 - 3 years. If they make it to 5 years, it's a miracle.
How to Confirm Your Batteries are Bad / How to Access the Batteries
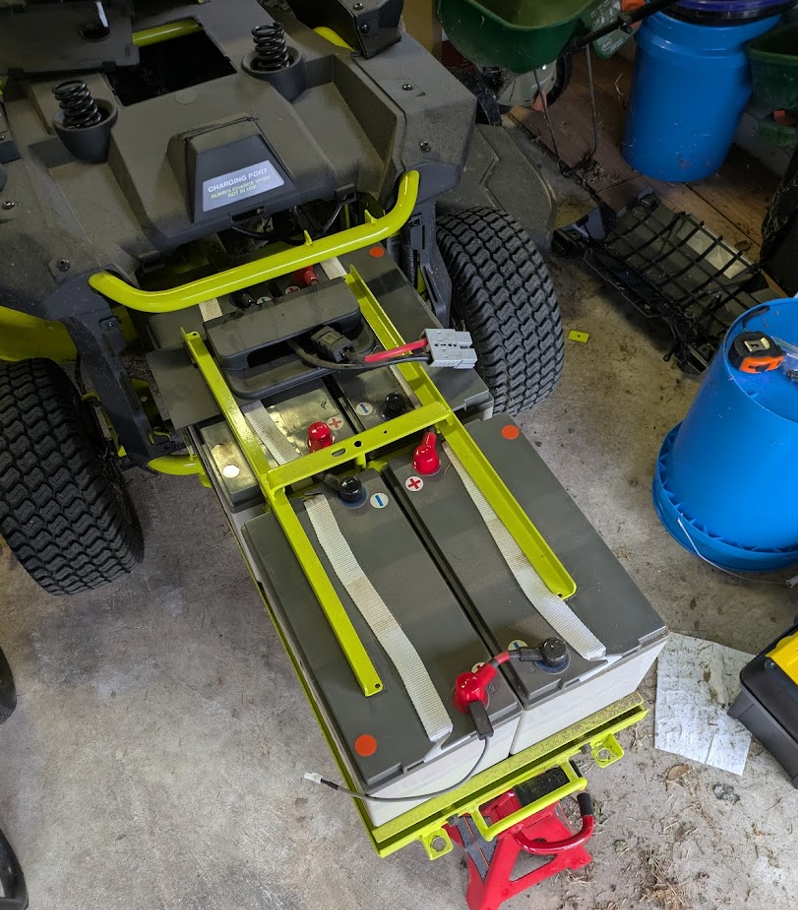
On the 480ex, it really isn't hard at all to get to the batteries, and in fact, there are some great videos online that show how you do it. Basically, you just need to unbolt a few things, and the battery "tray" will slide out.
But hold on! The batteries weigh like 400 pounds! So you MUST have something sturdy to slide the tray onto. I chose jack lifts:
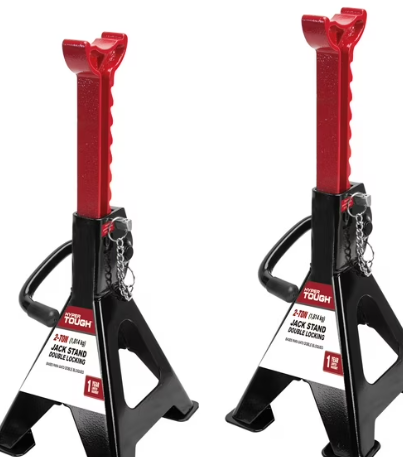
Just make sure everything is as sturdy as possible.
Okay-- once I had the battery tray extended, I disconnected everything and tested to see which battery was bad. But-- they ALL tested at 12 volts or higher! So none were bad? No-- instead I had to learn about something called "Cold-Cranking Amps" or CCA. And for that I needed a "load tester."
What the Hell is a Load Tester?
It's a little device you clamp onto your batteries, which tells their voltage. But, there's a physical button that when you push it simulates an engine trying to "crank" or "start," which draws extra power.
I bought a load tester from Amazon to perform my tests.
Testing the Batteries (for Real This Time)
So I have the battery tray pulled out....
And I DISCONNECT ALL THE BATTERIES from each other! Then, I test.....
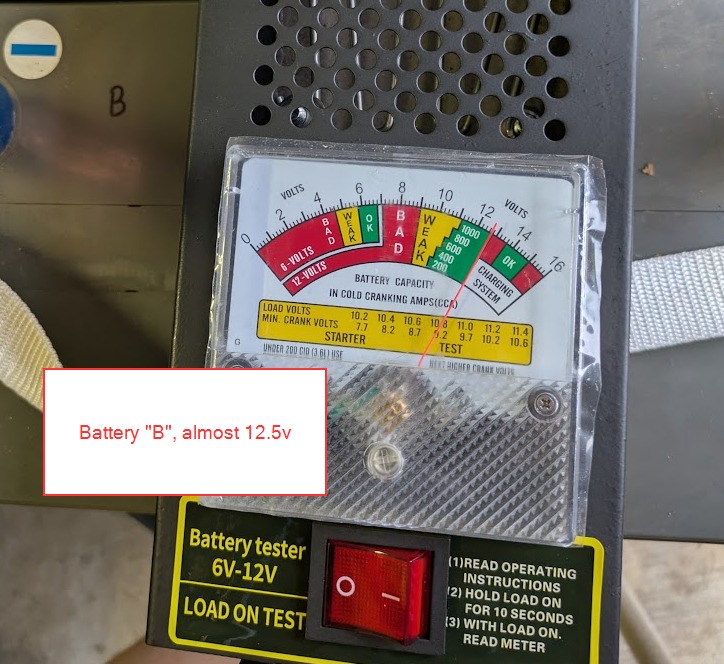
Okay-- so far so good. You can see the red gauge needle thing is pointing at almost 12.5 volts. Now let's press the button to do the "load test"....
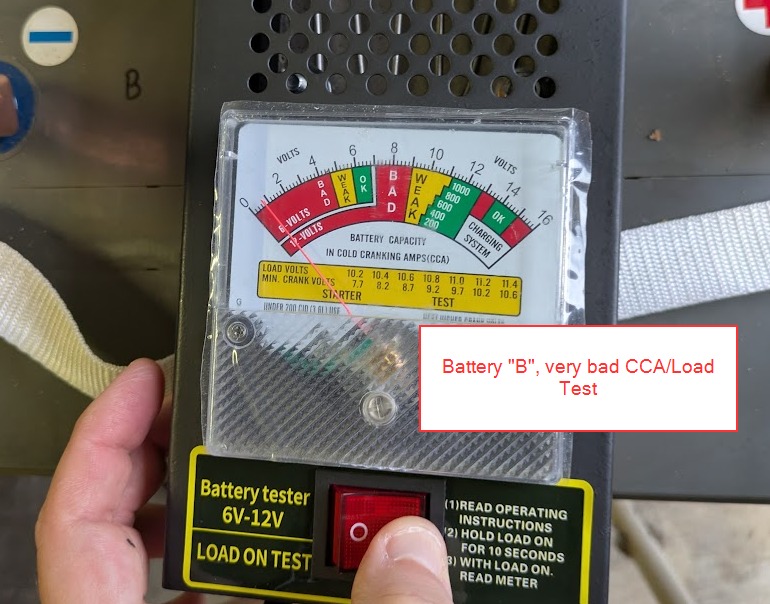
... and it's toast. The red gauge line is all the way to the left. It's way past "bad," it's barely registering more output than a potato.
And I tested the other three batteries, they all had similar results.
So What Now?
Well, I knew I had to replace the batteries, but I didn't want to spend an arm and a leg just to have to do it all over again in 1-3 years. I found that pretty much everyone online was talking about using Lithium batteries. Specifically LiFePO4. They are cheaper, lighter, don't damage themselves if they drop below 50%, and last around 10 years or more.
Most of the videos out there (as of this writing) use four LiFePO4 batteries and wire them up in sequence just like the original setup.
But I found a very helpful Facebook group, RYOBI 48v Riding Mowers, where some folks there convinced me to instead get a single 48v LiFePO4 battery.
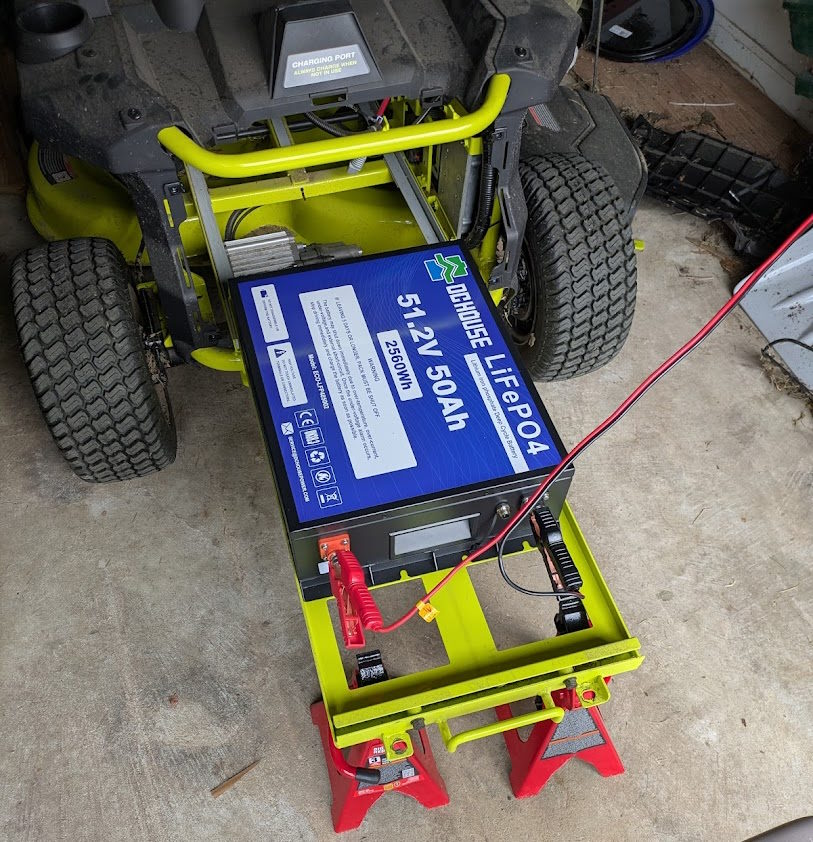
 After reading The Technical Penguin, which has excellent advice, I decided on the DC House 50Ah 48v LiFePO4 battery. But, there are several 48v LiFePO4 battery brands to chose from. I liked the one from DC house for a couple reasons:
- It was relatively cheap ($380 as of the time of this writing)
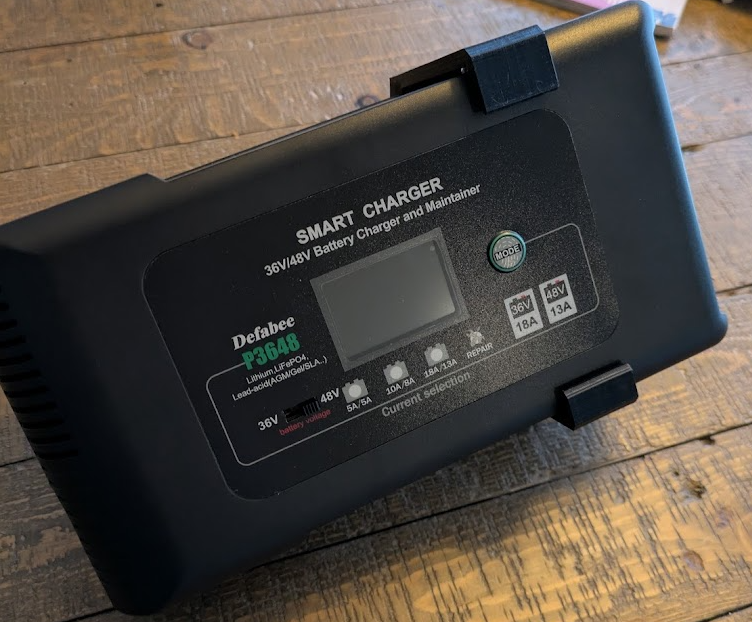
- I did NOT get the bundle with the charger, since I knew I was going to buy a different style charger from Amazon.
- It has a Bluetooth connection so you could check on the battery's health from your phone
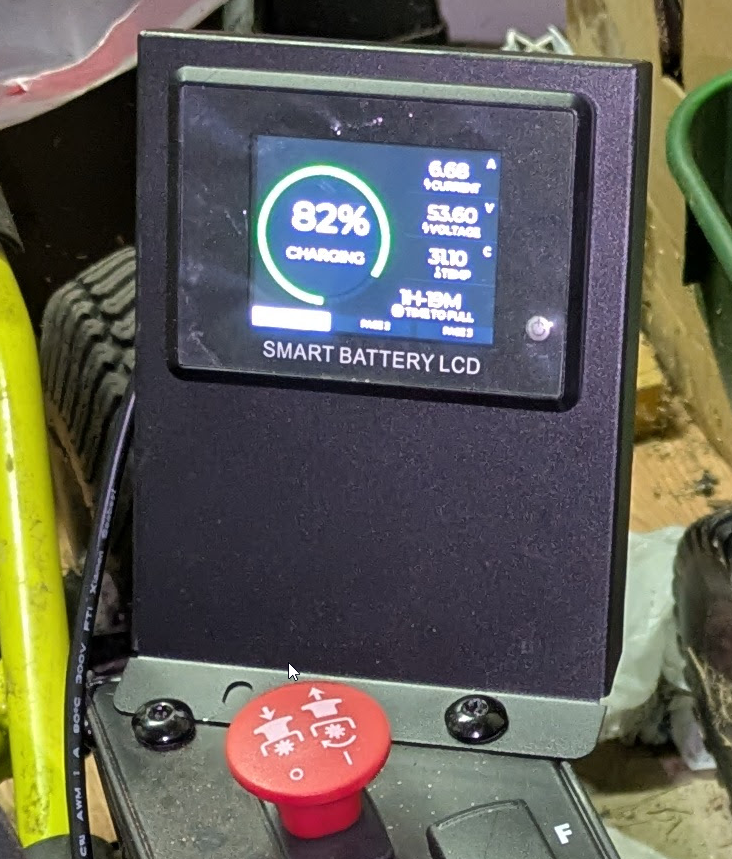
- It has it's own display meter thing that you could use to monitor the battery's charge
There are other brands to chose from, though. I'd check out The Technical Penguin's "shopping list." You can also buy them brand-new on eBay for a deal as well.
Any Downsides?
In general, the existing battery gauge on the mower won't work correctly. It won't hurt anything, but if you want to know how much charge is left in your new battery, you'll need to use the Bluetooth, or an aftermarket gauge you can get on Amazon, or in my case, the included battery meter that came with the battery.
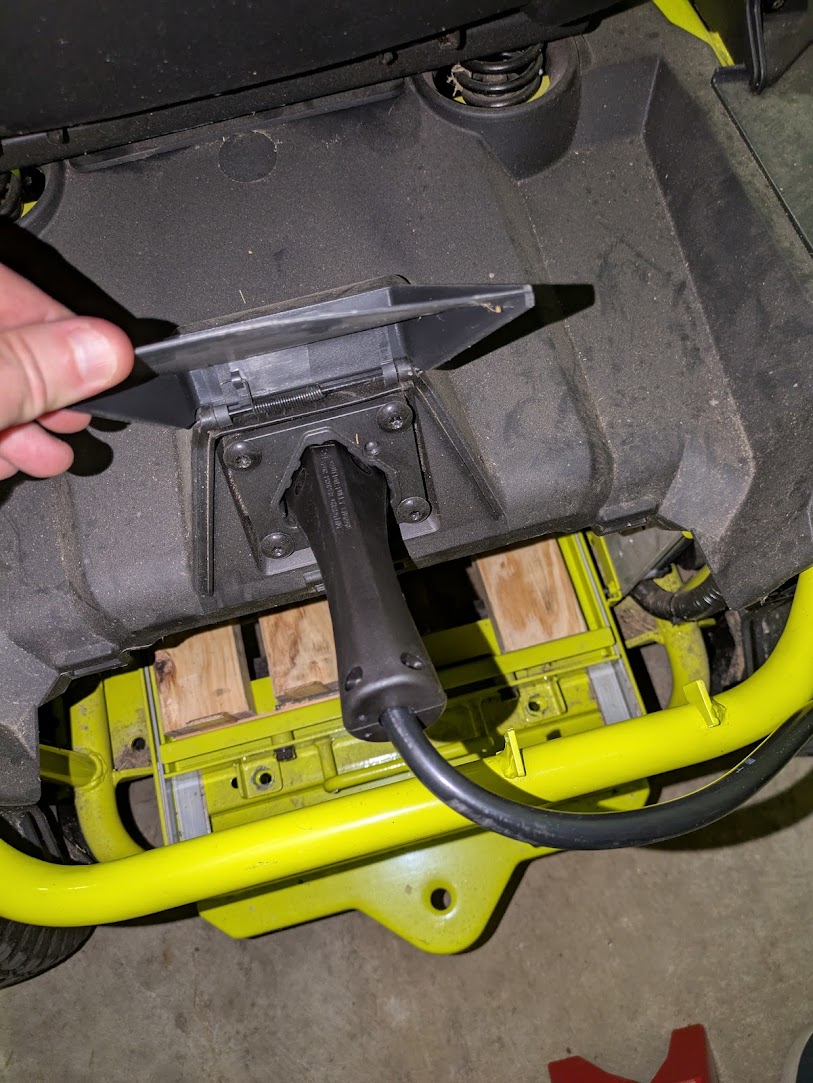
Also, you will need a charger which works specifically with these types of batteries. I bought this one off Amazon. Specifically you want the version with the triangular "delta-q" AKA "EZGO" AKA "EZ-GO" plug. It fits perfectly into the mower after you twist off two plastic tabs. See this short video on how to do it in 15 seconds.
I read online to charge at the 10A/8A setting for this charger (meaning that for 48v, it would be 8 amps). I'm not sure if that's really required, but it works fine. I guess it may be more gentle on the battery?
I 3D printed some wall brackets (again, see The Technical Penguin) for my charger, and it looks like this:
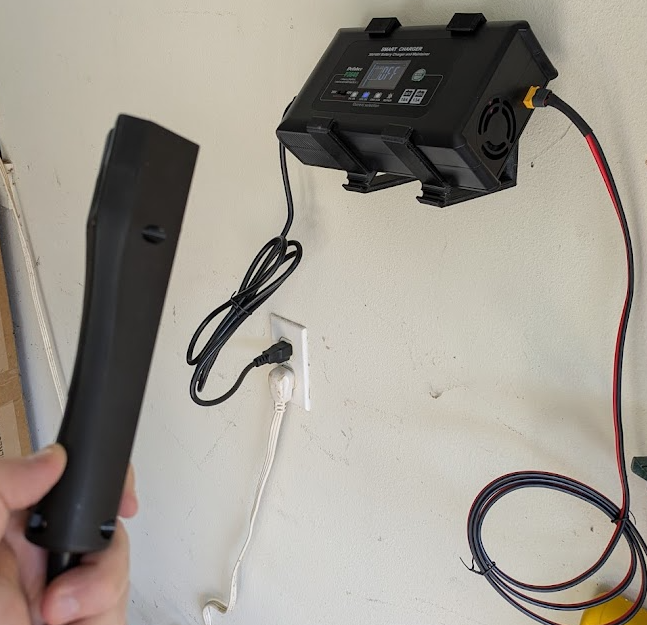
I also did buy an XT60 extension cable because of where I am set up, I needed it so the plug could reach my mower.
A quick note about the XT60 extension cable: the one I listed is 12-gauge, or 12 AWG. That can safely carry up to 20 amps. They also sell 10-gauge extension cables that can carry up to 30 amps. I chose to set my charger to only 8 amps, so 12 AWG is just fine. Just keep that in mind if for some reason you need to send a much higher amperage.
Finally, you need to secure the battery to the battery tray so it isn't flopping around. Most people use a ratchet strap (or something similar) as well as blocks of wood to keep it from sliding.
All said and done, I spent about $500 or less.
Initial Setups
When I first got the battery, I set up the Bluetooth connection and realized it was less than 50%:
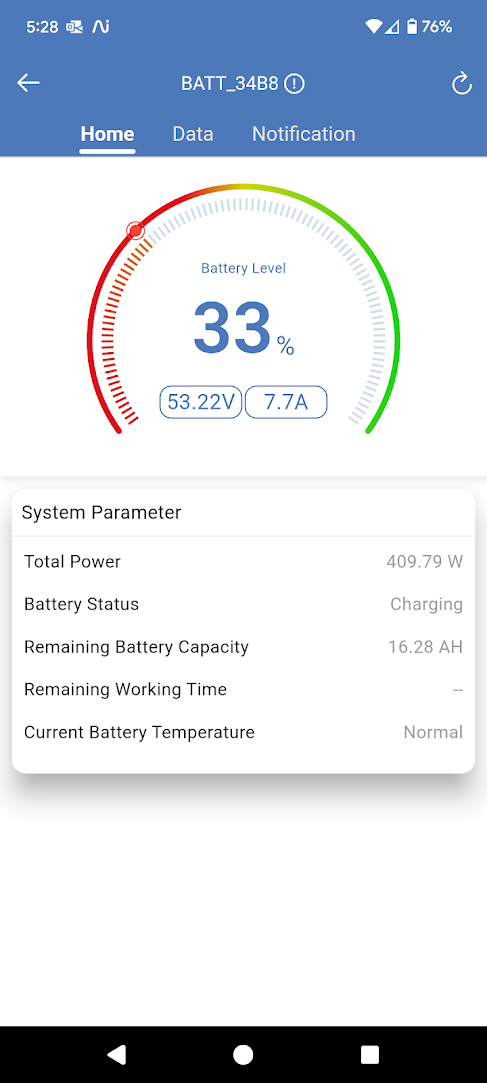
So I decided to charge the battery a bit before continuing. Luckily the charger I bought also comes with the classic red and black clamps. So, I attached them and let them run, and, so far so good-- it began charging:
After a few hours, it was at 80-something%, so I decided to go ahead and attach the battery to the existing wiring.
Connecting the Battery to the Mower
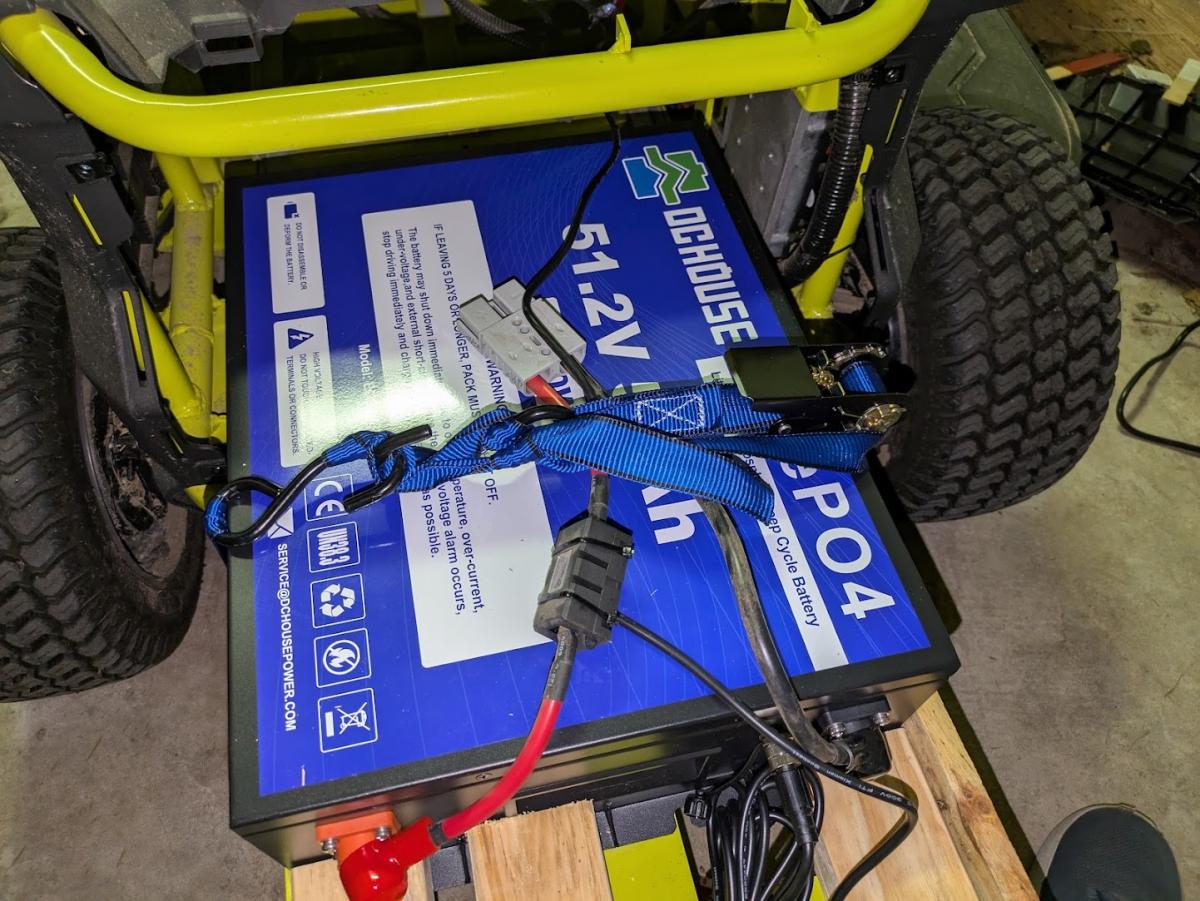
Step One: Bolt the old battery connectors onto the terminals of the new battery:
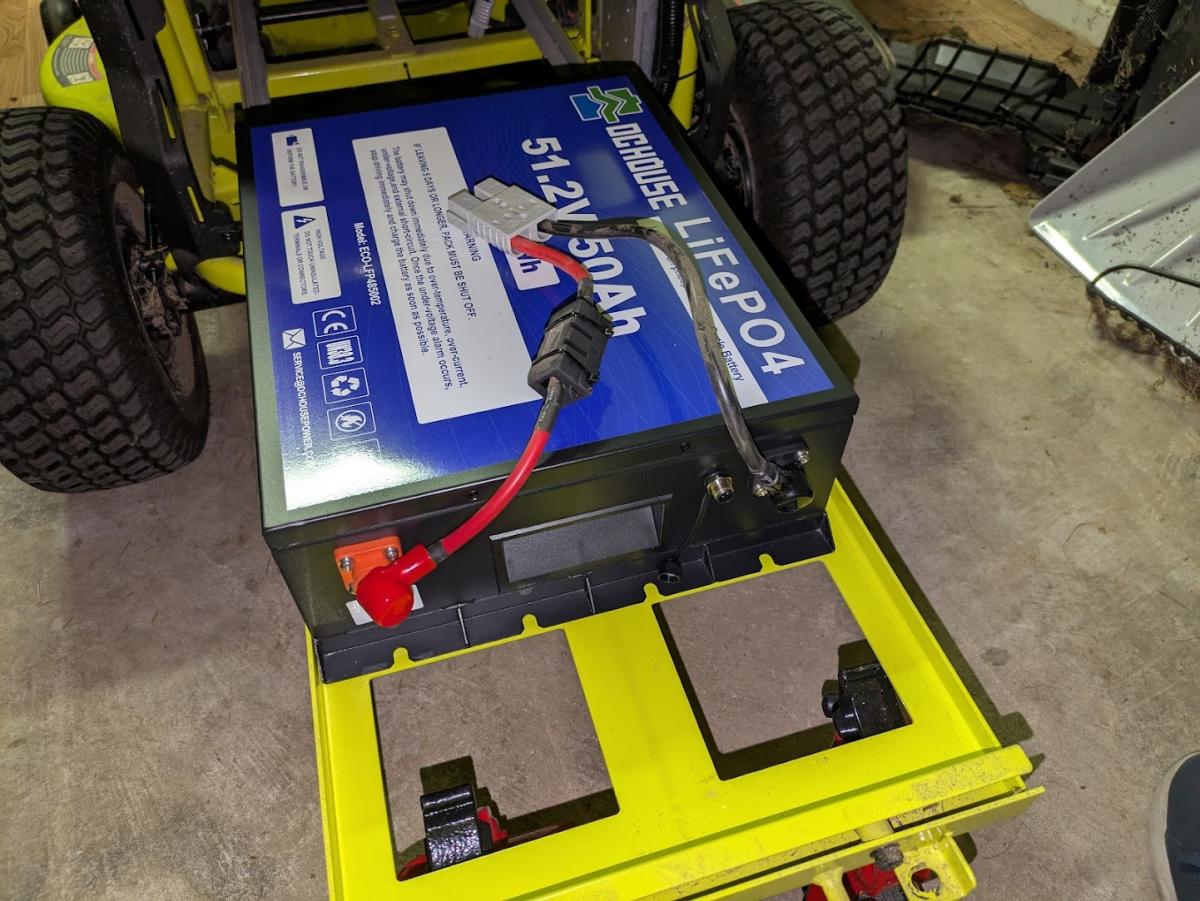
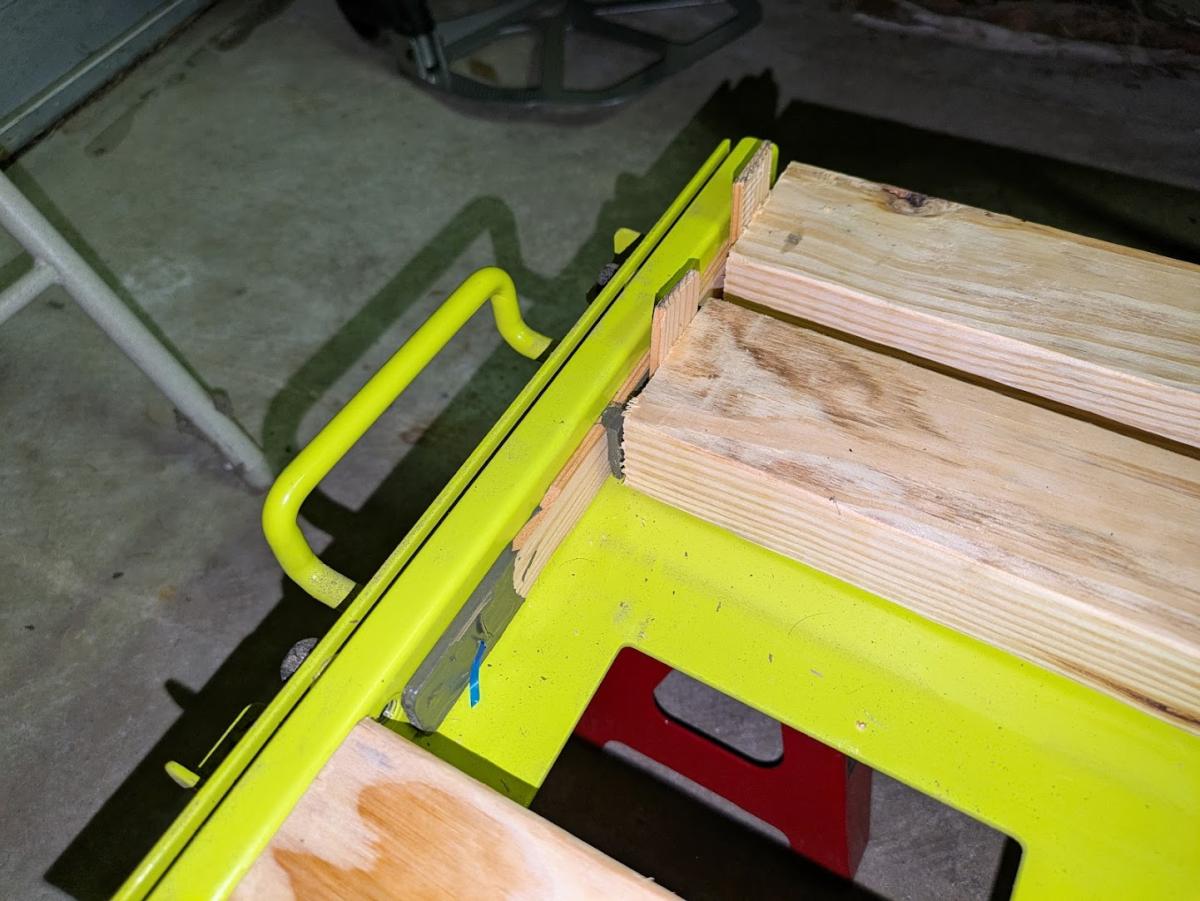
Step Two: Fill in gaps with spare wood so it doesn't slide around:
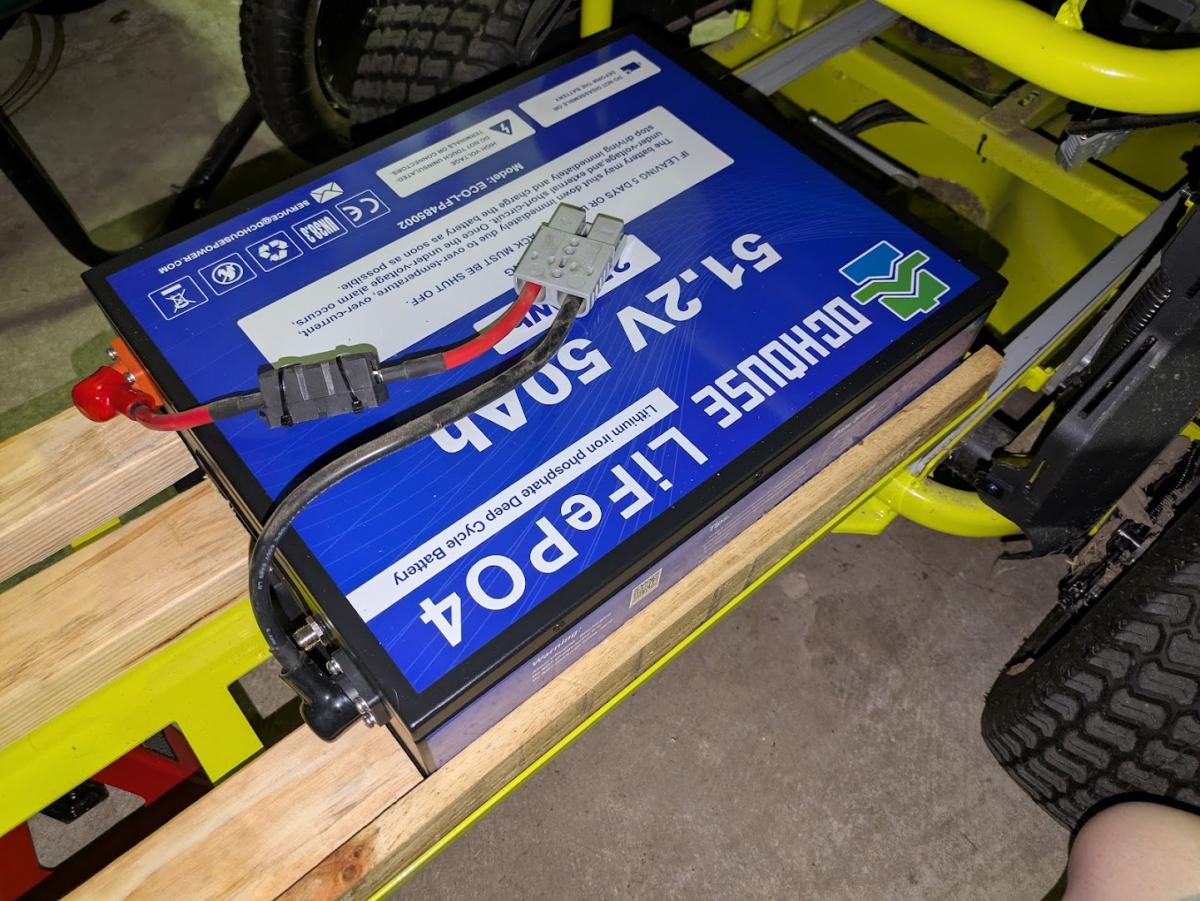
There were some slight gaps where the wood wasn't perfectly the right fit, so I used wooden paint stir sticks make it nice and tight. Had to pound them in lightly with a rubber mallet for a very snug fit:
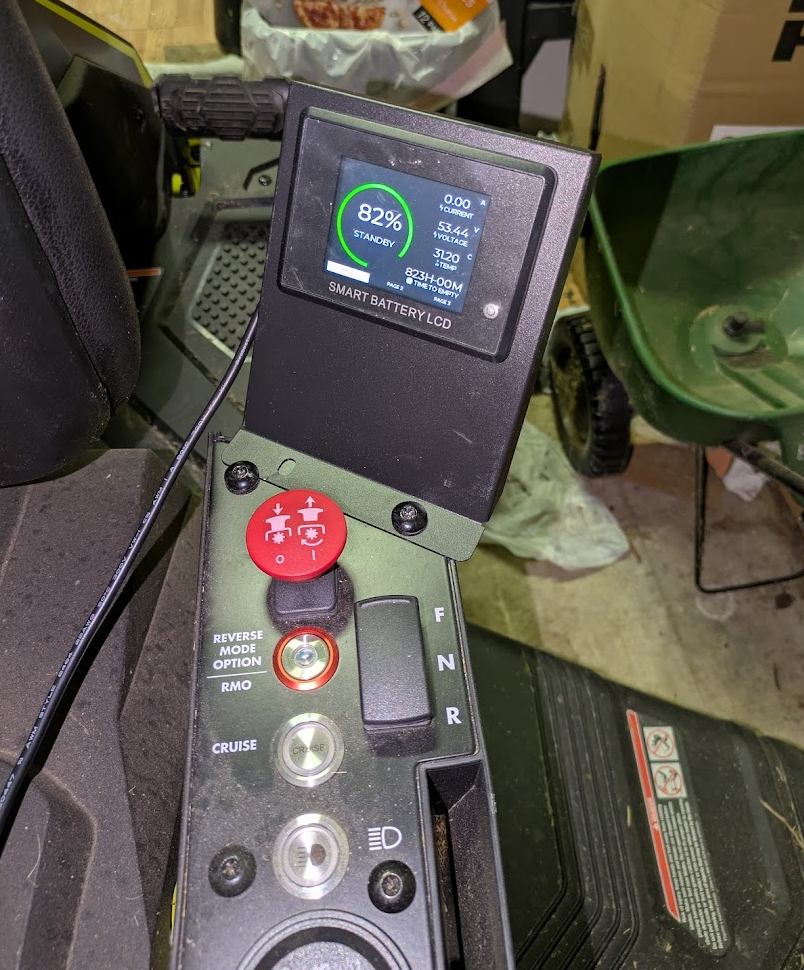
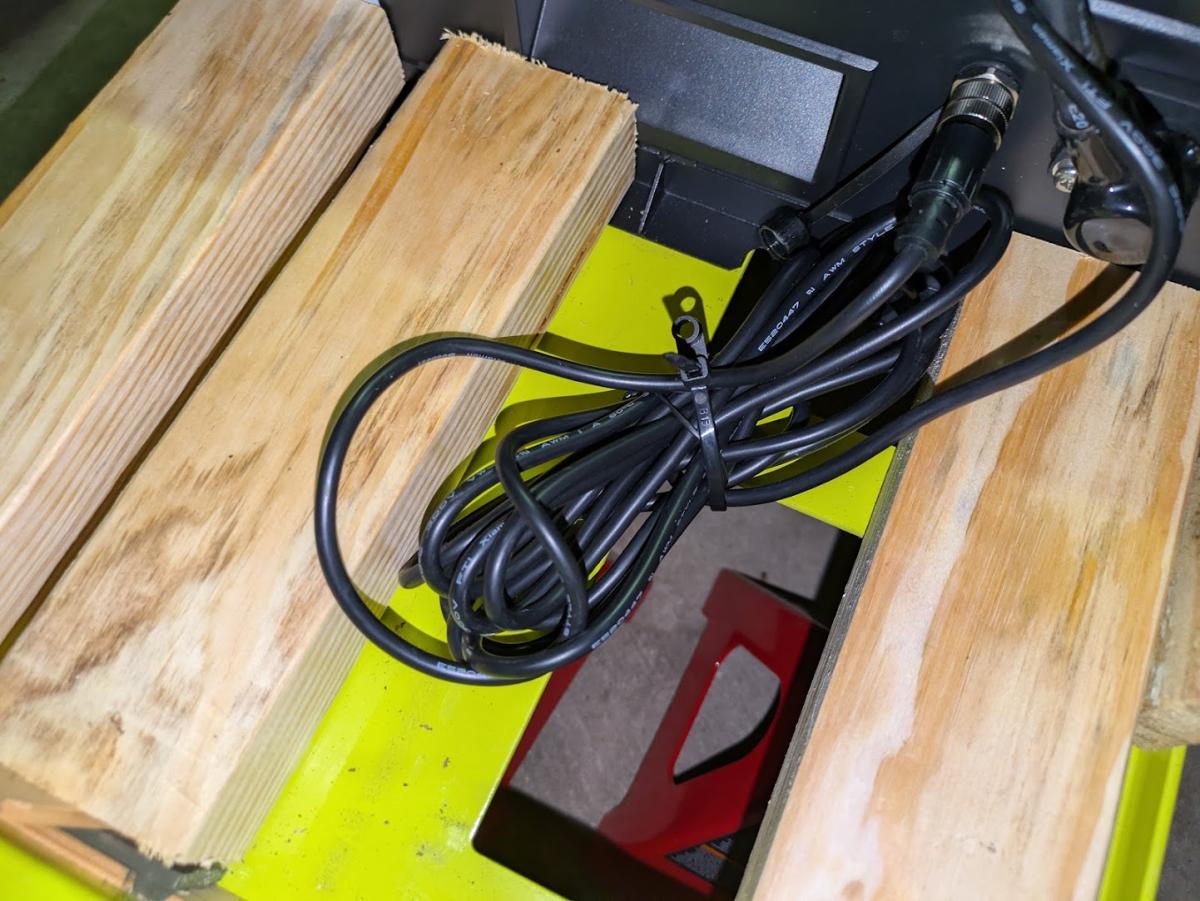
Step Three: I know I wanted to use the included electronic screen as the battery gauge, so I went ahead and got that mounted and had the wire lead back to where it plugged into the back of the battery. The excess I made sure to bundle up, then zip-tied in place to the bottom of the battery tray so it wouldn't go anywhere. More on mounting the screen later:

Step Four: Use a ratchet strap to make sure the battery stays put on the slide! You don't want it bouncing up and around. My job isn't pretty, but it is tight and secure. With the excess strap, I kind of wrapped it around the hooks and tied a few knots so it wouldn't come loose. Notice I put it on top of the wires, so they don't flop around either:
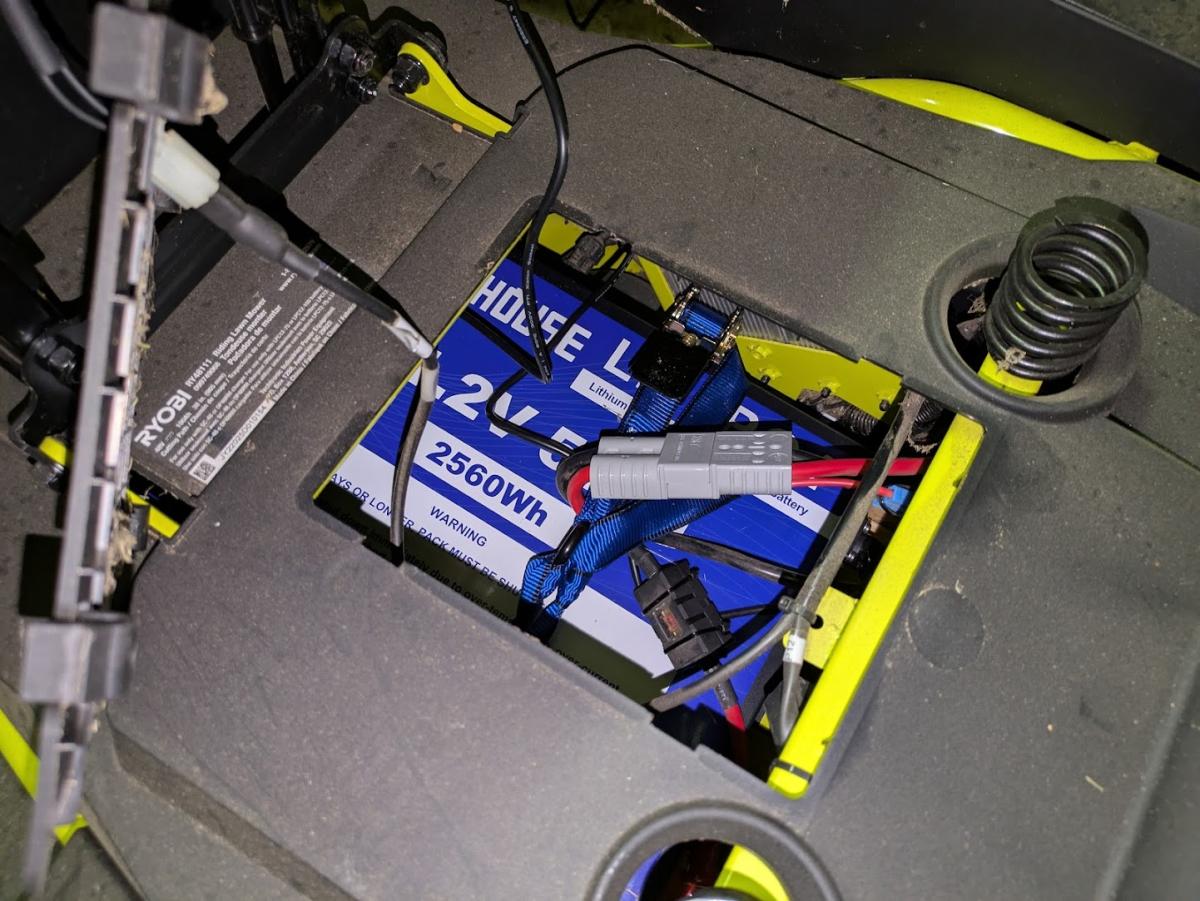
Step Five: Okay, we're almost done. With all of that in place, let's slide the tray back in, then under the seat we can re-connect the two gray connectors (which connects the battery to the mower / charging port):
Step Six: Okay, one thing left to do! Let's turn on our charger, connect it, and see if it starts charging. You may need to press the "power" button on the little screen for the display to turn on:
Success!
Let's Talk a Little More About Mounting the Screen
As you can see in the pictures of the screen, I have one of the original screws actually going through a mounting hole. This is probably enough to keep it in place, but I wanted to be extra-secure, so I backed out the other screw a little, and tightened it down onto the edge of the metal of the display bracket thing. This seems to be a pretty tight fit, so I think it's OK.
You can feed the wire through the hole in the access cover where the seat sensor is, but I wanted it tight against the right side, so I actually decided to sort of pinch it in place under the plastic flap. See here:
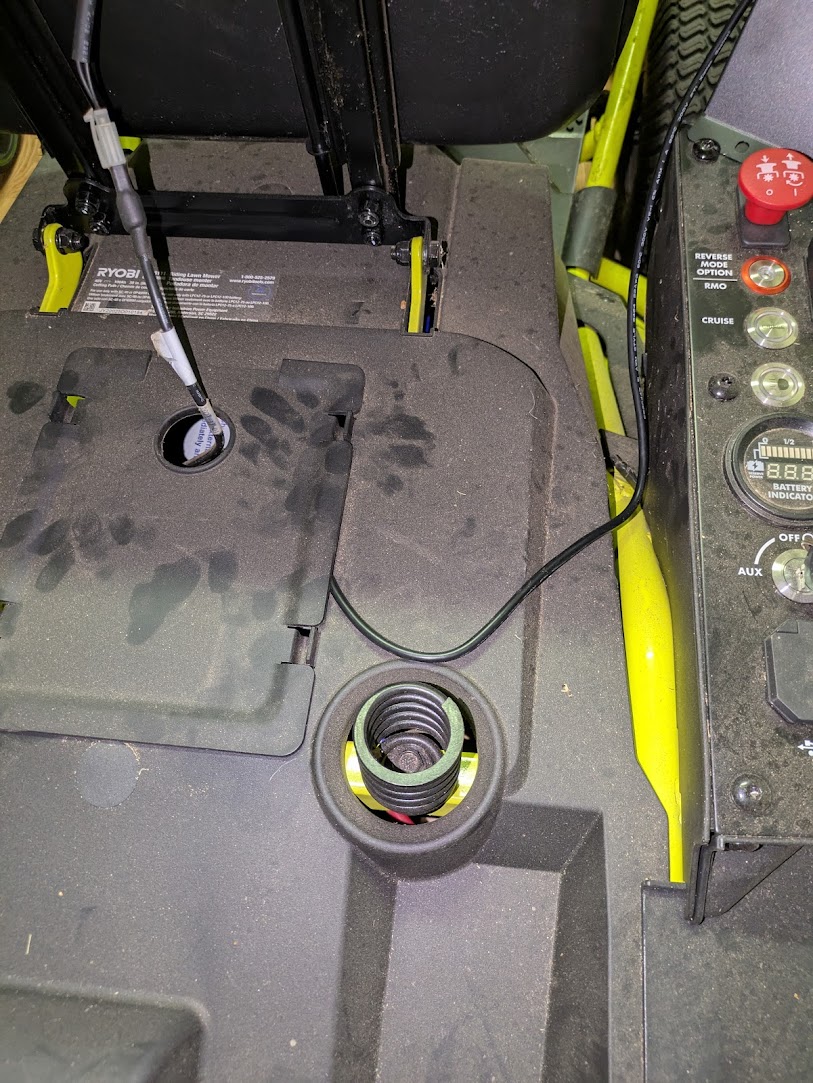
Realistically, it's just plastic, so I might cut out a little notch right there to let the wire fit in without being pinched. But for now it works. I also plan to secure the wire against the right-side, possibly with zip ties or something else to keep it tucked securely out of the way. That's for another day however :)
Re-assemble the bolts & washers holding the sliding battery tray in place and put the back plastic back on, and you're done!
Other Little Things
- There is a "temperature sensor" for the original batteries which you no longer need (if you are NOT using the original RYOBI charger, which I'm not). It's a little box with a wire coming off. Some people say to toss it in a box somewhere, but I decided to zip-tie it to the cables to keep it out of the way, just in case I need it again one day.
- That's another thing-- you're going to be left with some metal and plastic brackets and such which you no longer need. I am just putting them in a box in my attic, again, just in case I need them again in the future.
- The battery I got says do not charge it if the temperature is under 0C or above 53C. That's eqv to 32F and 130F. Since the display screen shows the battery's temperature in Celsius (and I don't know/care to change it) you might want to write with a silver sharpie on the black mounting bracket for the screen those temperatures. After cutting the grass in the summer, the battery might indeed be over 53C, so it shouldn't be plugged in to charge until the battery has a chance to cool down. Likewise, if it's the winter and it's going to be below freezing, it's best to go out an unplug the battery until it warms back up.
That's All Folks!
I hope others find this post useful. There were a lot of different resources out there and it took me a while to piece everything together that I needed to do. Once I had all my parts, though, it was all very simple and straight-forward. Anyway-- if you made it this far, thanks for reading!
Update - One Year Later!
Well, it's been a full year since I made this conversion, so I wanted to give a quick update:
- First of all, everything is still working great. I've had zero problems with the mower, the battery charging, etc. I live in an extremely hot climate, so I was a little worried that the extreme heat would cause some kind of issue, but it hasn't so far. The battery holds a charge and discharges perfectly; no problem.
- If I had to do it over again, I could see getting a smaller-sized battery (ie, 25Ah). I got the 50Ah battery, and even if I mow both my yards (I live on a 1/4 acre lot), I still have around 70% - 80% battery life remaining at the end. I normally just mow one yard at a time, so sometimes I end with up to 90% battery life.
- Also, while the bluetooth concept for the battery is a neat idea, I honestly never use it. I love the screen though.
- So if I were starting over, if there was another battery that was cheaper and a smaller capacity (but still had a screen of some kind), I'd go with that.
- I did end up cutting a little notch in the plastic where the screen's cable goes through, so it doesn't get pinched. I also used heavy-duty zip ties that go completely around the right "arm" of the mower to keep the cable in place. It all looks very clean and professional.
- I checked on my battery after a year to make sure it was still snug and secure-- it was. Hadn't moved at all.
- I never had an issue with the battery temperature being even remotely close to 53C (that was a possible concern I had). Even on the hottest days, it was fine.
Conclusion: I love this upgrade. It was easy, fun to do myself, and way cheaper than buying 4 new traditional batteries.